cassette duplication for dummies
a physical media circlejerk
Inside a cassette tape, there is a magnetic strip that degrades over time with every play/rewind as the particles and binding agents that contain waveform data eventually decay and fall apart. Moisture and temperature expedites the progression towards permanent distortion, dropouts and information loss. The music becomes something to preserve. You must love that hoe. Over time, the high end smoothes out and the audio sounds warm, the surface texture becomes more pronounced, notes expand and flutter, and the bass gently hugs the eardrums. On the right set of speakers/headphones, the stereo quality can sound quite beautiful and becomes something that cannot be replicated with a digital file.
I think there's a lot of nuance that's lost in modern streaming services and distribution. The design of the inserts, images, typography, etc. Kelela's 'In The Blue Light' is a fantastic example. Since my first release, a chatroom love story, I started recording my music onto tape with the intention of designing physical packaging of my projects and giving them to my friends. I took a lot of inspiration from cassettes in my growing collection and had help from Jasmine and Heath for different projects. It's a really powerful feeling, especially with music, to be able to hold and feel something that you've spent so much time and energy making.
1. music worth recording on tape
2. tape deck with recording function
3. 50 blank cassettes
4. 50 cassette casses (norelcos)
5. color printer (or a friendly neighborhood print shop)
6. 9 tabloid-size cardstock paper
7. a sick 3 panel j-card design
8. 9 label sticker sheets (x6 side A and side B labels per sheet)
9. bone folder + scoring board
10. paper cutter
11. 50 shipping envelopes (and maybe some stickers)

When selecting blank tape, you need to consider the length of your project. Since a cassette tape has a side A and side B, you need to divide your project into two halves (as close to the same time length as possible) and purchase the correct length of tape. The tape shell and case is really a matter of preference of color or texture finish. duplication.com has a lot of information about cassette duplication. I source my blanks and cases from there. Great customer service, quality, and fast shipping (ships international from Canada). For 50 blank cassettes, it was about $1.30 per cassette or $65 total. For 50 cassette cases, it came out to about $0.44 per case or $22 total.
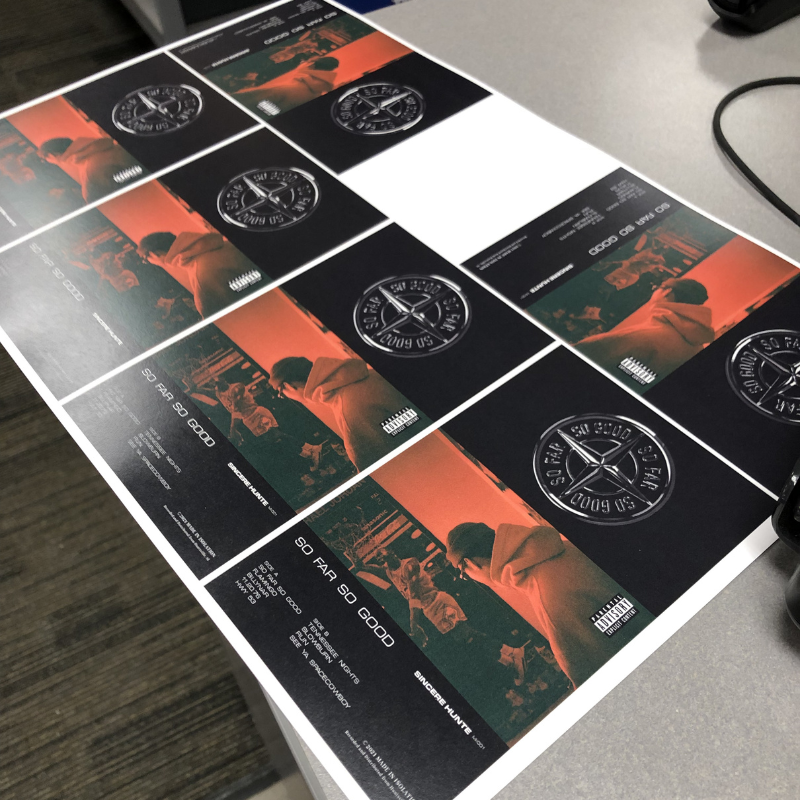
Majority of the effort is put into desinging the j-card insert. A j-card has two sides, the outside - which is what someone sees when holding the cassette case, and the inside - which is revealed when unfolding the insert. The j-card is divided into panels. The minimum would be 3 panels with the skinniest panel being the spine of the cassette. You can find templates on duplication.com For my most recent project, type j: unlimited, I made 4 panel j-cards which means there is an additional fold. Then, I use photoshop to create a double-sided printsheet of tabloid size paper to arrange copies of the outside design on one side and the inside design on the other. This allows you to print multiple copies of the j-card and save a couple dollars on paper - you will have to cut them out though. You can safely fit 6 on one page. I suggest going to a local printshop because their printers will do a better job of getting the double-sided alignment as close as possible with tighter margins. It is important to maintain the exact dimensions of the original designs so that the aspect ratio is not altered when you arrange the printsheet and the opposite side isnt misaligned or skewed.
For recording "type j: unlimited", I split the total album playtime as close to half as possible without splitting a track to minimize the amount of 'dead space' at the end of a play side. Unfortunately, I purchased tapes with 36 mins total runtime before I finished the album, so I had to trim the ends of some tracks (a few songs got flagged for samples so I had to cut those songs out and replace them...). Cassette tapes have around 5 ~ 6 seconds of filler tape before the actual magentic tape. In the timeline view, I arrange the tracks so that there is 6 seconds of 'dead space' before the first track of the side begins - so that when I record onto tape, I can hit play on my computer and the tape deck at the same time.
For the master channel, I have a utility to add around 8 dB of headroom, then use an eq to boost the high end and cut some low end. This process is trial and error depending on your tape deck + tape selection. Typically -6dB on the low end and just a bit of boost works great on most tapes but for this album I ended up just adding more headroom and then boosting the mid-high end. Then I use a limiter to bring the whole album to around a -12 dB LUFS with at least -0.1 dB TPM (Youlean Loudness Meter is a FANTASTIC free tool metering tool). Honestly, the overall loudness level really just depends on how much input gain you're using on your tape deck and how much distortion you're willing to live with. On the tape deck, I found that I could get away with the gain meter bouncing around +1 ~ 2 dB, with just a tasteful amount of clipping. Once I'm happy with the arrangement and levels, I export side A and side B separately and record straight from my audio interface output into my tape deck, listen back, and then make adjustments to the eq/limiter as necessary.


At the end of the day, this is all just for the love of the game. Honestly, I don't know anyone that owns a cassette player besides Jemma, who has a tacoma pickup with a tape deck, or Heath, who has one of those oldschool sony walkmans. My parents had a huge dusty collection of contemporary korean music and christian hymnal tapes, but they don't like techno...
Anyways, I have a few more TYPE J: UNLIMITED tapes lying around... if you want one, go to my bandcamp!![]()
I think there's a lot of nuance that's lost in modern streaming services and distribution. The design of the inserts, images, typography, etc. Kelela's 'In The Blue Light' is a fantastic example.
Since my first release, a chatroom love story, I started recording my music onto tape with the intention of designing physical packaging of my projects and giving them to my friends. I took a lot of inspiration from cassettes in my growing collection and had help from Jasmine and Heath for different projects. It's a really powerful feeling, especially with music, to be able to hold and feel something that you've spent so much time and energy making.cassette ingredients
makes 50 cassettes1. music worth recording on tape
2. tape deck with recording function
3. 50 blank cassettes
4. 50 cassette casses (norelcos)
5. color printer (or a friendly neighborhood print shop)
6. 9 tabloid-size cardstock paper
7. a sick 3 panel j-card design
8. 9 label sticker sheets (x6 side A and side B labels per sheet)
9. bone folder + scoring board
10. paper cutter
11. 50 shipping envelopes (and maybe some stickers)
cassette design
Once I feel like the music for a project is complete or near finished, I brainstorm ideas for the packaging of the cassette which is made of four physical components: the tape, tape shell, case, and the 'j-card' insert. There are different types of tape, divided into categories based on the formulation of the magnetic tape. Each has a different sound quality. I use Type I since it's relatively cheaper, normal bias, and the most universal (not every cassette deck can play all types of tape). Type I, normal bias, tape is made from ferric oxide and is known for it's bassy-ier sound, rougher texture, and lack of fidelity at higher frequencies. Not necessarily a bad thing but it is something to consider later when recording. This guy has a good write-up discussing the different types of tape.When selecting blank tape, you need to consider the length of your project. Since a cassette tape has a side A and side B, you need to divide your project into two halves (as close to the same time length as possible) and purchase the correct length of tape. The tape shell and case is really a matter of preference of color or texture finish. duplication.com has a lot of information about cassette duplication. I source my blanks and cases from there. Great customer service, quality, and fast shipping (ships international from Canada). For 50 blank cassettes, it was about $1.30 per cassette or $65 total. For 50 cassette cases, it came out to about $0.44 per case or $22 total.
Majority of the effort is put into desinging the j-card insert. A j-card has two sides, the outside - which is what someone sees when holding the cassette case, and the inside - which is revealed when unfolding the insert. The j-card is divided into panels. The minimum would be 3 panels with the skinniest panel being the spine of the cassette. You can find templates on duplication.com
For my most recent project, type j: unlimited, I made 4 panel j-cards which means there is an additional fold. Then, I use photoshop to create a double-sided printsheet of tabloid size paper to arrange copies of the outside design on one side and the inside design on the other. This allows you to print multiple copies of the j-card and save a couple dollars on paper - you will have to cut them out though. You can safely fit 6 on one page. I suggest going to a local printshop because their printers will do a better job of getting the double-sided alignment as close as possible with tighter margins. It is important to maintain the exact dimensions of the original designs so that the aspect ratio is not altered when you arrange the printsheet and the opposite side isnt misaligned or skewed.recording...
I use Abelton to arrange the album tracks in a single project so that there is one portion for 'side A' and another for 'side B'. Pro tip: I keep the master tempo at 120 bpm so that the timeline grid aligns with minutes:seconds.For recording "type j: unlimited", I split the total album playtime as close to half as possible without splitting a track to minimize the amount of 'dead space' at the end of a play side. Unfortunately, I purchased tapes with 36 mins total runtime before I finished the album, so I had to trim the ends of some tracks (a few songs got flagged for samples so I had to cut those songs out and replace them...).
Cassette tapes have around 5 ~ 6 seconds of filler tape before the actual magentic tape. In the timeline view, I arrange the tracks so that there is 6 seconds of 'dead space' before the first track of the side begins - so that when I record onto tape, I can hit play on my computer and the tape deck at the same time.For the master channel, I have a utility to add around 8 dB of headroom, then use an eq to boost the high end and cut some low end. This process is trial and error depending on your tape deck + tape selection. Typically -6dB on the low end and just a bit of boost works great on most tapes but for this album I ended up just adding more headroom and then boosting the mid-high end. Then I use a limiter to bring the whole album to around a -12 dB LUFS with at least -0.1 dB TPM (Youlean Loudness Meter is a FANTASTIC free tool metering tool). Honestly, the overall loudness level really just depends on how much input gain you're using on your tape deck and how much distortion you're willing to live with. On the tape deck, I found that I could get away with the gain meter bouncing around +1 ~ 2 dB, with just a tasteful amount of clipping. Once I'm happy with the arrangement and levels, I export side A and side B separately and record straight from my audio interface output into my tape deck, listen back, and then make adjustments to the eq/limiter as necessary.
assembly...
Once I have my print sheets and cassettes, I use a straight paper cutter and cut each individual j-card and use a 'bone folder' to make a crease for each panel edge to make the folds cleaner. It's also important to mention that you should probably avoid printing on cardstock heavier than 80 lb since the ink may rip when you fold it. Next, I print the cassette shell labels onto specific cassette label stickers and very carefully place them onto each cassette and then record the audio for each side separately. This can be kinda tricky since you gotta avoid any air bubbles or misalignments so I print a few extra sheets just to be safe (i got some shaky ass hands). For my setup, I have my computer connected to an audio interface with the output into the tape deck and then I hit play on the audio file and record + play on the tape deck at the same time (this is where the 6 seconds of deadspace comes to play). You can chill and do something else while the music records for the entire side. Then repeat this for side B and then do it again 49 more times LOL.At the end of the day, this is all just for the love of the game. Honestly, I don't know anyone that owns a cassette player besides Jemma, who has a tacoma pickup with a tape deck, or Heath, who has one of those oldschool sony walkmans. My parents had a huge dusty collection of contemporary korean music and christian hymnal tapes, but they don't like techno...
Anyways, I have a few more TYPE J: UNLIMITED tapes lying around... if you want one, go to my bandcamp!